
Rowing is an excellent cardiovascular exercise and an effective fat burner but it also has the potential to hurt you if you do it wrong. Unlike an exercise bike or cross trainer, which are quite hard to do wrong, a lot can go awry when using a rowing machine.
In this complete guide, you’ll learn everything you need to know about how to use a rowing machine so you can exercise in both comfort and safety.
contents
TL;DR
This post will provide you with everything you need to execute effective and safe workouts on a rowing machine. But I understand if you’re short on time or just super eager to get going with your new rower.
If that’s you, I’ve provided a short video below that will briefly explain the rowing machine technique in 60 seconds! I suggest you watch the video, save this post and come back to it once you’re ready to up your rowing game.
Rowing Machine Technique In 60 Seconds!

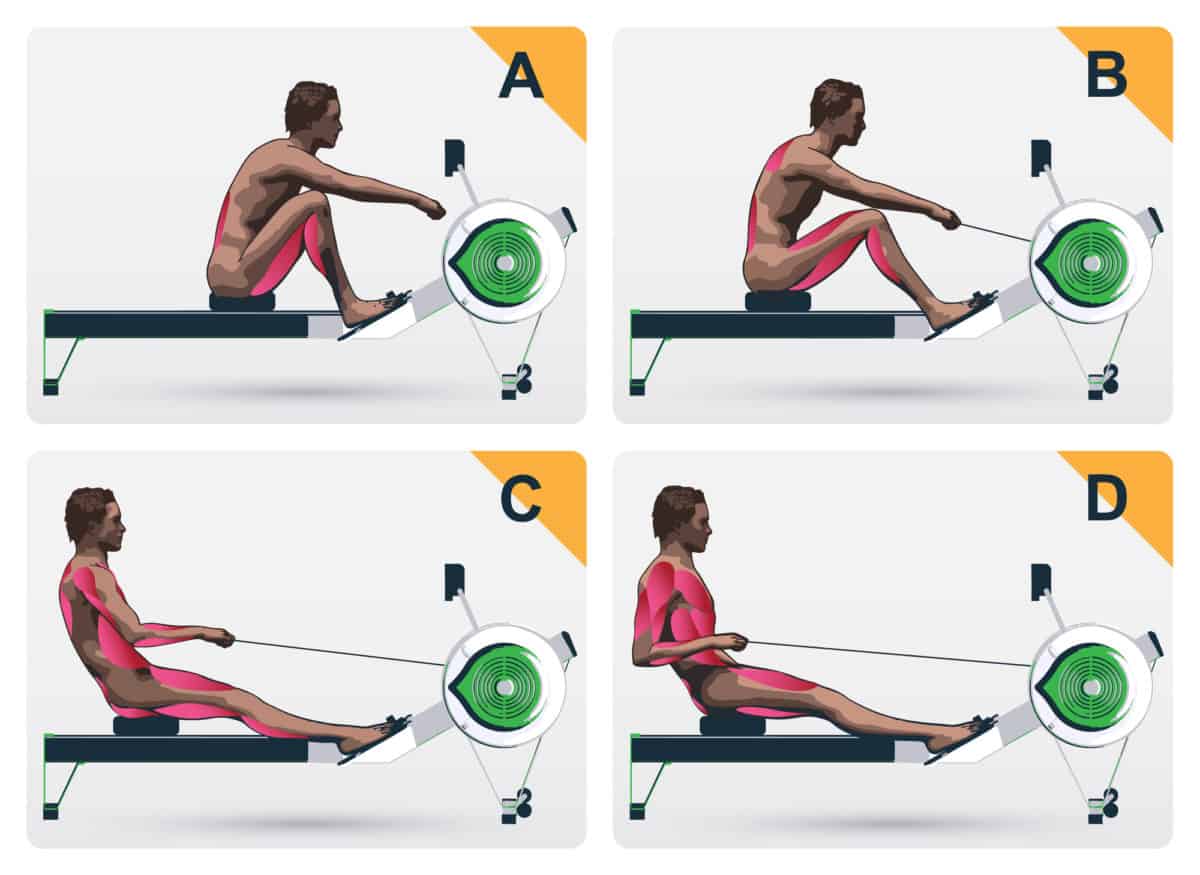
Starting Position
Although there are various types of rowers, the position you’ll take up to row effectively will remain the same. It’s super easy to learn and once you get the technique down you’ll be rowing like a pro in no time.
The first step would be to turn on the monitor screen (if your rower has one) which will keep track of all your stats. Sit on the seat and slide forward – this will save you having to lean forward and round your back excessively. Switch the rower on and select the functions you require. Initially, the timer is probably all you need. But don’t worry about this, for now, we’ll come back to the settings later.
So start by securing your feet in the footplates. Adjust the plate so that straps go over the ball of your foot. Tighten the straps so they are snug but not so tight you end up cutting off the blood supply to your toes. Ultimately you want the position to be comfortable. Your feet should not move or slide up and down once you have started rowing.
Grab the handle with an overhand grip. Ideally, your hands should be around shoulder-width apart but very few rowers have a wide enough handle to permit this so use the widest grip you can. Wrap your fingers AND thumbs around the handle – no thumbless grips, please.
With your arms straight, your hands level, and just below shoulder height, sit up straight. Pull your shoulders down and back, look straight ahead and try to sit on the boney part of the bottom of your pelvis – properly called your ischia.
While your lower back will most likely be rounded, do your best to keep this to a minimum. Depending on your flexibility, you will probably find it is all but impossible to sit up with a slightly arched (neutral) lower back but you’ll significantly reduce your risk of injury by rounding your lower back as little as possible.
Now you’re in the perfect position to start rowing.
Proper Rowing Machine Form
An extra step to make sure you really nail the technique is to break down the movement into isolations. Proper rowing form can really help make sure you get the most out of your workout so it’s with spending a few minutes performing a few reps of each.
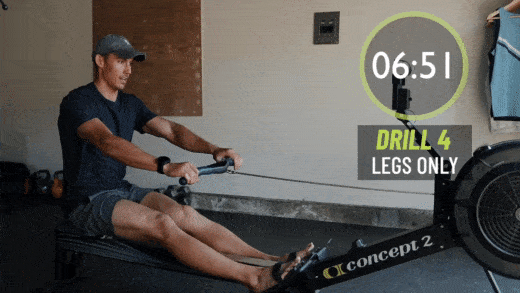
Leg Isolations
Assume the starting position mentioned above and from here you will push off the footplates using only your legs. Extend at the knees and slightly swing back by opening up the hips, keeping your core engaged and your back straight. Then return to the starting position. Keep your arms extended throughout the movement.
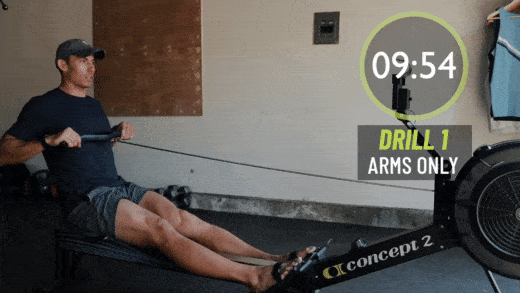
Arm Isolations
After a few reps of leg isolations, you should feel comfortable with the movement. Then extend at the knees, slide back and keep your legs straight. This is your starting position for arm isolations.
Using the muscles of the upper back, pull the handle towards the chest, keep your elbows in and slightly touch the handle below the ribcage. Then reverse the movement by extending at the elbows.
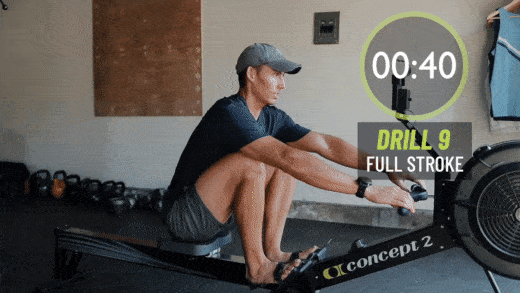
Once you’ve got the isolated movements down, you’ll find putting it all together into a smooth rowing motion will be much easier.
Putting the movements together
From the starting position, keep your arms straight, push with your legs to drive yourself backward. As the handles pass over your knees, pull the handle into your ribcage. The handle should reach your ribcage at the same time or slightly after your legs reach full extension.
Your elbows should be close to your ribs and not flared outward and your wrists should be straight with your hands level – no twisting the drive chain. Complete your pull with a slight backward lean.
Next, extend your arms and, as the handle passes over your knees, bend your legs and slide forward. Do not crash into the console by sliding forward too fast – keep control at all times. Once you are back in your starting position, perform another stroke.
Many newbie rowers may find it hard to coordinate their arms and legs so just remember this sequence:
Legs -> core -> arms -> arms -> core -> legs.
The Rowing Stroke Explained
Once you’ve learned the above you’ll know enough to get going and start working out. However, if you understand the rowing stroke and how you can manipulate it, you’ll be able ahead of most and really put yourself in a position to get the most out of your workouts.
The rowing stroke has 4 phases, the catch, the drive, the finish, and the recovery.
The Catch
The catch is our starting position. Remember to lean slightly forward keeping your back straight, core tight and grip handle loose. You want to be in a powerful but relaxed position.
Your shins should be as close to vertical as possible whilst remaining comfortable. Make sure your shoulders are in front of your hips and do not tighten up around the neck, head, and shoulders. Fully extend the arms and engage your lat muscles.
This is the best positioning to allow you to generate a large amount of power to move into the drive phase.
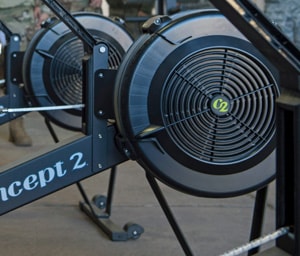
The Drive
Drive the legs up and extend at knees by pushing your heels into the foot pedals. Slide along the rail, swinging the body back using your hips, and start pulling the handle in a straight line towards your chest just as your hands cross over your knees.
You’ll find the seat and handle move simultaneously in a synchronized rhythm. This helps create a smooth rowing motion.
As you might expect, this will be the most demanding part of the movement but try and stay relaxed throughout. A good cue is to look at the shoulders. They should be low, not hunched up by your ears.
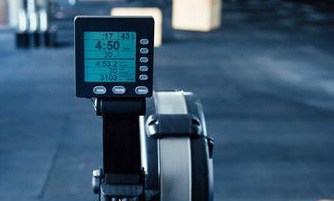
The Finish
The finish is the final positioning of the body at the end of the stroke. At this phase the torso will be leaning back slightly, your legs will be extended, elbows tucked in towards the torso and back behind the body, with the handle lightly pulled in below the rib cage.
This position is held for a brief moment before reversing the movement and entering the recovery phase.
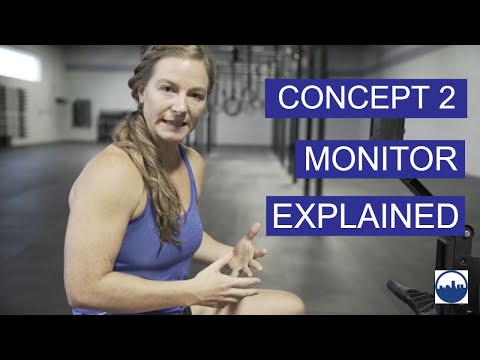
The Recovery
The recovery phase is the most relaxed part of the movement and as the name suggests allows for a moment of recovery.
Execute the recovery phase by performing the motions of the drive phase in reverse. Remember our movement order from earlier? Well, this is the arm core legs part.
Extend the arms and use your core to lean forward, gradually allowing the seat to glide forwards along the rail. Bend the knees once the hands have cleared them and keep moving forward until you are once back in the catch position.
You are now set up for your next stroke.
Practice your strokes at a low resistance level until you get to grips with the technique. Once you can confidently row continuously for 5 minutes or so you’ll be ready to increase your power output.
Power
The more power you are able to generate, the harder your workout will be. 60% of the power generated during rowing should come from your legs, not from the force at which you pull the handle like many may assume. The final 40% should be split evenly between the core and the arms.
That’s why it’s so important to get the form down first as you’ll be able to feel what muscles are working the most if you’re rowing correctly.
To increase the intensity of your workout you can generate more power by pushing and pulling harder (keeping with our power percentages) and moving with more speed.
Varying resistance levels with power output allows for a wide range of workout types to be performed on a rower.
Timing
The final thing we’ll add is timing. The drive-out is the most explosive part of the movement and should last for a count of one. The recovery should last for a count of two.
This timing should be maintained regardless of your speed.
Common Rowing Machine Mistakes
Here are some common rowing mistakes I often see:
- Using the arms too early – initiating your stroke with a powerful leg drive takes the pressure off your otherwise weaker arms. Trying to start the stroke with your arms will cause you to lose power and get tired quicker.
- Rounding the lower back – excessive rounding places an inordinate amount of stress on the intervertebral discs and lumbar ligaments. Easily injured and slow to recover, this is the last thing anyone needs! Make sure you sit up tall and work hard to keep your back from rounding.
- Not fully extending the legs – your legs are the engine room in rowing so use them fully. Extend your legs all the way to make the most of the power they can provide. Do not snap your knees straight though – that’s a recipe for injury.
- Not pulling the handle all the way into your ribcage – in an effort to start sliding forward again as soon as possible, many rowers cut their arm pull short. This is very inefficient and also causes that annoying “chain slap” that often accompanies many rowing workouts. Pull all the way into your ribcage each and every stroke.
- Always putting the resistance on high – the resistance damper on the rower is not unlike gears on a bike so you should choose the setting based on what type of workout you are doing and your preferred rowing style (slow and powerful or fast and light). Damper settings are discussed below. For new rowers, a low damper setting is generally best.
Understanding the Functions of your Rower
Once you have mastered the art of rowing it’s time to explore the settings and functions offered by your machine. Obviously, these features are dependent on the sort of rower you are using but at least some of the following will apply to your particular machine.
Damper
Many rowers use a large wind fan for resistance. By opening or closing the vents on the side of the fan, you can increase or decrease the resistance you experience when you pull on the handle.
Some rowers actually use water for resistance and others use a friction brake but the wind fan models are arguably the best.
Many people make the mistake of putting the damper/resistance on maximum for every type of workout they do. This is like only ever using one gear when you drive your car or ride a bike.
The damper/resistance setting should be adjusted so to maximize your rowing performance and there are several factors to consider here:
- Speed of your workout – sprint workouts would benefit from a higher damper/resistance setting to give you plenty to pull against. 500-meter sprints, for example, warrant a high damper/resistance setting.
- Distance – the further you intend to row, the more conservative your damper/resistance setting should be. A high setting will probably cause you to fatigue too quickly. For my recent rowing marathon, I used a damper setting of six however, for 2,000-meter time trials, I’ll use eight. Setting ten is reserved for hard interval training of 1000-meters or less.
- Preferred stroke rate – depending on your personal preference, you might row at anywhere between 18 and 34 strokes per minute. Taller rowers tend to use a slower stroke rate and shorter rowers use a faster one. A high damper/resistance setting is most appropriate for slower rowing cadences while a faster rowing cadence is usually best achieved with a low setting.
- Specificity – if you are training for rowing on water, you should set your damper/resistance to match the density of water to make your training as specific as possible. Rowing machines such as the Concept2 models have a specific function to facilitate this.
Remember, you may need to change your damper/resistance setting periodically during your workout. Your warm-up may require a low setting while you go for a higher setting for hard intervals.
A steady-paced set piece of 5000 meters will require a different setting and then, for your cool down, a low setting is best.
The bottom line is you should choose your settings like gears on a bike – select the most appropriate one for what you are doing.
Unit Display
Most rowers have a display that will show the duration of your workout and how much work you have done. The work units displayed usually include meters, calories, and watts.
Select the units that are most appropriate to your training goal. If you are working on speed or distance goals, meters are the most useful measure but if you are or interested in weight control, calories will probably be of more interest.
Split Times and Pacing
Rowers don’t tend to show your speed in miles or kilometers per hour. Instead, they display your time per 500-meters. The faster you row, the lower this figure will become.
The display may show your average speed per 500-meters or your current speed – it all depends on the model you are using and the setting you have selected. Some rowers will also show your predicted time for completing the workout you are doing which is a very useful pacing tool.
Distance Display
When you hop on most rowers and start rowing, the distance display will be at zero and start increasing. It will then stop when you stop rowing. However, some rowers allow you to preprogram your rowing distance or time so the machine counts downward instead.
This is a useful function if you are trying to improve your rowing speed and is also more motivating as you see the distance or time remaining gradually decrease.
Interval Timer
Interval training is an effective way to build fitness, make your workouts more interesting, and burn fat. Rowing machines often have programmable timers that allow you to set your work to rest periods and even the number of repeats you want to perform.
Depending on the model you are using, you may be able to enter interval times, interval distances or combine the two.
Preset Programs
Rowers like Concept2 have several preset programs that are accessible through a simple push of a button. Some workouts are well-designed interval training workouts while others are standard distances or durations such as 5,000-meters or 30-minutes. This is a nice time-saving feature.
Data Recording
It’s useful to compare your workouts so you can see how your fitness is improving and while you could just jot the results of your workout down on a piece of paper, some rowing machines record the details of your workout for you.
This information can then be exported using a data card or USB lead directly to your computer for storage and subsequent analysis. This is a very handy function if lots of people use the same rower. Some machines also allow you to upload custom workouts using the same date card/USB system.
Heart Rate Monitor
Many endurance athletes use heart rate monitors to measure the intensity of their workouts. Heart rate monitors consist of a chest belt and a display watch. Some rower monitors have a built-in heart rate display or have the facility for you to plug in a receiver so you can see your heart rate more easily. This will save you from having to keep looking at your watch during your workout.
The more familiar you are with the settings and functions of your rowing machine, the more you will get from your workouts. Use these functions and settings to customize your rowing training and make each training session as productive as possible.
Conclusion
You now have all the information you need to ensure you can use a rowing machine properly and safely. Time spent now mastering your rowing technique will ensure that your workouts are productive and painless so keep practicing your rowing technique until it becomes second nature.
If you’re interested in purchasing your own home rower as opposed to using the gym rowing machine, take a look at our best rowing machine reviews.